
These pictures are of the blanket I made for Caleb around Christmastime. I took pictures so I wouldn't forget what I did, but thought it would make for a fun blog post too. Let me just say this. If I can make a fleece blanket, anyone can!
Here's what you'll need:
Two contrasting fabrics:
Two yards for the top (which is the print), and three yards for the bottom. Have it cut in two pieces, measuring one yard and two yards respectively. The fringe uses about a yard of fabric and I have found it easier to have the store cut the fabric for me.
Embroidery floss in a coordinating color and a large eyed needle
Sharp scissors
Rotary Cutter
Cutting mat
Crochet hook
Sewing machine
The first thing to do is lay the two yards of contrasting fabric on top of one another and trim off the manufacturer's edge. I use a rotary cutter and a cutting mat for this. These are a little pricey unless, of course, you cut out the 50% off coupon for any item at the local fabric store! Actually, I bought all of the fleece on sale when it was 50% off too.After trimming and lining up all of the edges, pin both pieces together and then, using a zigzag stitch or a stitch that's stretchy (my machine's zigzag doesn't work so I found this other one that works great) and stitch both pieces of fabric together. I use the cut edge of the fabric as my guide for the foot of the sewing machine. It sews about a quarter of an inch from the cut edge of the fabric.
I usually look at the fabric to see if I need to make any adjustments. Caleb's pattern was pretty random and so I didn't need to do anything special to it. Mr. Wonderful's fabric, however, was a grid of squares, so I ended up cutting off about two inches on one side so the blanket looked symmetrical (otherwise I would have had half a square running down the right side of the blanket). His blanket actually matches on both sides and along the top and bottom. I know this isn't necessary, but I just thought it made it look nicer.
The next thing I did was use a strand of embroidery floss to create ties across the blanket. This probably isn't necessary either, however, if you take this added step, it helps keep both the top and bottom of the blanket together and virtually eliminates sagging. I look for a pattern in the fabric and create the ties every few inches or so. Mr. Wonderful's blanket was very easy since I just followed the squares and created a tie at every other one.

In Caleb's blanket, each guitar was tied.

Notice my stretchy stitch!
Creating the base for the fringe is a little tricky if you don't have sharp scissors. Practice first on a couple of pieces of discarded fabric (when you cut off the manufacturer's edge) to get the hang of it. Don't make the slits too big. If your scissors aren't sharp, well, get them sharpened. Otherwise, you will become very frustrated. I know from experience!
Basically, fold over the fabric so there's about a quarter of an inch from the stitch to the fold. Carefully snip through both the top and bottom fabrics at half inch intervals. When finished, you will end up with quarter inch slits along the entire length of the top and bottom of the blanket.

This is the base for the fringe and it runs along the top and bottom of the blanket.

Now, take that extra yard of fabric and cut off the manufacturer's edge. You will want to pull on the fabric in order to determine which way it stretches. Fold the fabric in half so the stretch runs from top to bottom on the cutting mat. Next, using a straight edge, cut the fabric in 8 inch lengths. Then, using a ruler, cut each of the 8 inch lengths into one inch strips.
Are you following me so far? I think it's easier to do than to try and write here!
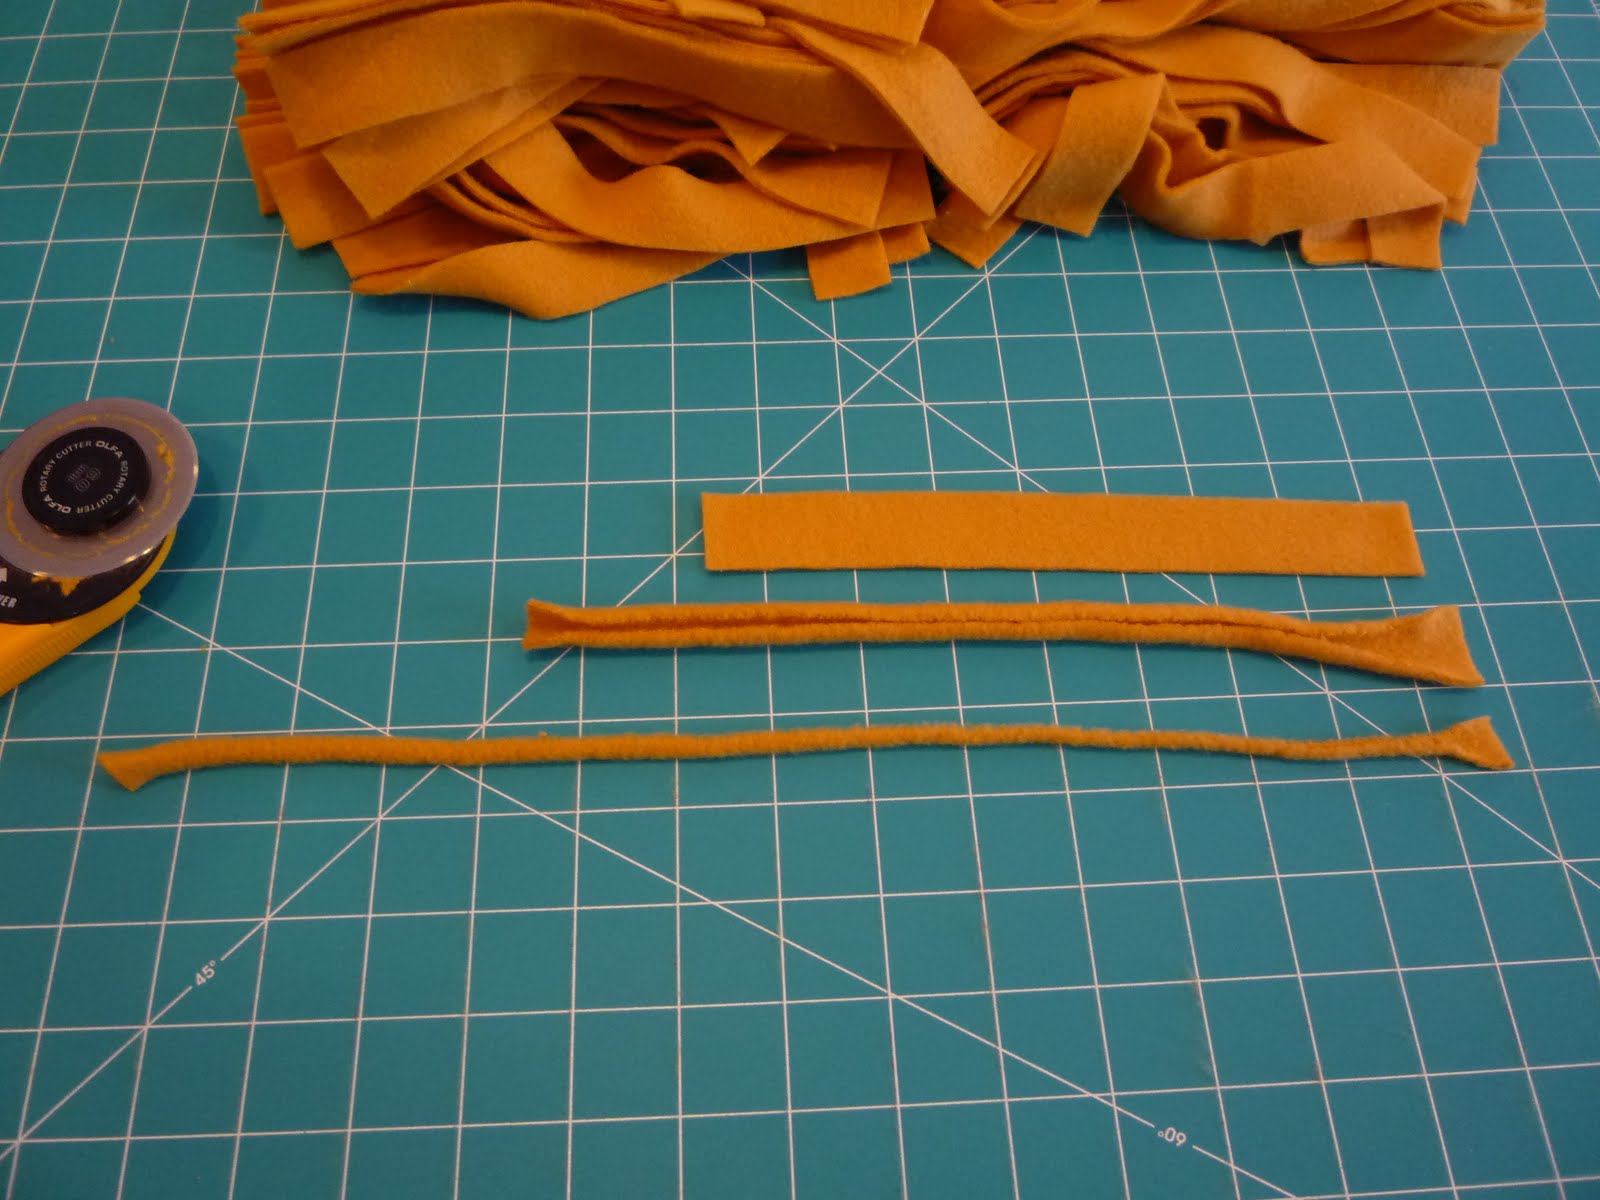
This is to show you what happens when you stretch the fleece. The top piece is 8 inches in length and an inch wide. When pulled, it stretches to 10 inches. If you cut the fabric 8 inches in length and a half inch wide, you can see it stretches to almost 15 inches! I have done this for fun, but have never actually created fringe this way. More so because it would take so long to make (you'd have to cut slits every quarter inch instead of every half an inch).

Using a crochet hook (this is a plastic hook that came with a pot holder kit that belonged to one of the kids) with the bottom fabric facing up, pull a stretched strip through the hole.

Just like this...

Next, pull the two ends through the loop and pull tightly creating a knot.

They line up very nicely and create a solid fringe all along the top and bottom of the blanket.

And there you have it! A fleece blanket that's very heavy and very warm.
Guaranteed to become the favorite snuggle blanket, especially on cold winter nights while watching Pride and Prejudice. Of course, you can do what I've done and make everyone their very own blanket or just make one really, really big one!
Stay warm wherever you are...

Guaranteed to become the favorite snuggle blanket, especially on cold winter nights while watching Pride and Prejudice. Of course, you can do what I've done and make everyone their very own blanket or just make one really, really big one!
Stay warm wherever you are...


WOW!
ReplyDeleteThat is a lot different than the way I did mine. We took off the MFG. Stuff and laid both together. Cut four inch square out of each corner. The we cut four inches deep every inch. Then go back and tie each one in a knot. Yours looks Great! And a little more "finished"
They are warm and cozy. SO Much Better Than A "Sunggie" :)
Elbel
Hello my Elle Belle!
ReplyDeleteRachel made her blanket exactly like you described except her corners were five inches square. It's really adorable and she did a great job. I wanted something that didn't have the bumpy knots (you know me, everything has to be soft!) and so found a different way to add fringe.
By the way, Mr. Wonderful loved his blanket!
I love you!
XX OO
I LOVE YOU TOOOOO! Muwahhh! :)
ReplyDelete